
Key facts: Maintaining siding in winter
- Boston winters bring repeated freeze-thaw cycles, snow, coastal storms and ice dams that stress siding joints, trim and wall bases. [1]
- Most winter siding trouble starts small — a loose panel, a gap at trim or a blocked gutter — and grows when meltwater finds a path behind the cladding. [2]
- A short fall inspection, a spring thaw check and prompt attention to loose or cracked boards keep small winter issues from becoming larger wall problems. [3]
Boston winter siding care
How to maintain siding in Boston winters
Boston winters ask a lot of siding. Cold nights, thawing days, wind-driven snow, coastal storms and ice along the eaves all press on the same joints, laps and trim boards, season after season. A wall that looked sound in September can show a loose panel, a lifted corner or a damp patch by March, not because the siding failed all at once, but because small openings let meltwater in and repeated freezing and thawing widened them. The good news is that most of that trouble is preventable with a simple routine: inspect in fall, clean and seal what needs attention, keep gutters moving water away from the wall, watch snow and ice from the ground through winter, and walk the walls again after the thaw. This guide follows that seasonal rhythm, so you can work through it one step at a time and know what to look for at each stage.
You do not need ladders, power tools or specialist knowledge to do most of this care. Almost everything in the checklist below can be done from the ground with a pair of binoculars, a garden hose, a soft brush and a notebook. The aim is to catch the small things early: a panel that has slipped out of its lock, a bead of caulk that has pulled away from trim, a downspout that spills water against the foundation, or a board that sounds hollow when tapped. When you find something you cannot reach safely, or a problem that covers a wide area, that is the moment to bring in help. A call to Siding Contractors Boston at (857) 414-1576 connects you with an independent local contractor who can discuss the home on the call and arrange a closer look.
Seasonal calendar
A season-by-season maintenance calendar
| Season | When to act | Main tasks | What to watch for |
|---|---|---|---|
| Fall | Before the first hard frost | Inspect every wall, clean the siding, seal trim joints, clear gutters and trim shrubs back from the walls | Loose panels, cracked boards, gaps at trim, blocked gutters and foliage touching the cladding |
| Early winter | At the first snow and cold snaps | Keep snow away from the base of the walls, watch the eaves for ice, and check that downspouts run clear | Snow piled against siding, icicles along one gutter run, and water pooling at the wall base |
| Midwinter | After storms and during thaws | Check walls from the ground after wind and snow, look for lifted panels and fresh water marks, and keep gutters moving | Panels out of line, trim that has shifted, damp patches below the eaves, and downspouts blocked by ice |
| Spring thaw | After the last snow has melted | Walk every wall with fall photographs, sort findings into tidy now, watch, and seek advice, then plan the season ahead | New gaps, slipped panels, cracked caulk, lifted paint, stains below the eaves, and soft or swollen boards |
Where winter finds a wall first
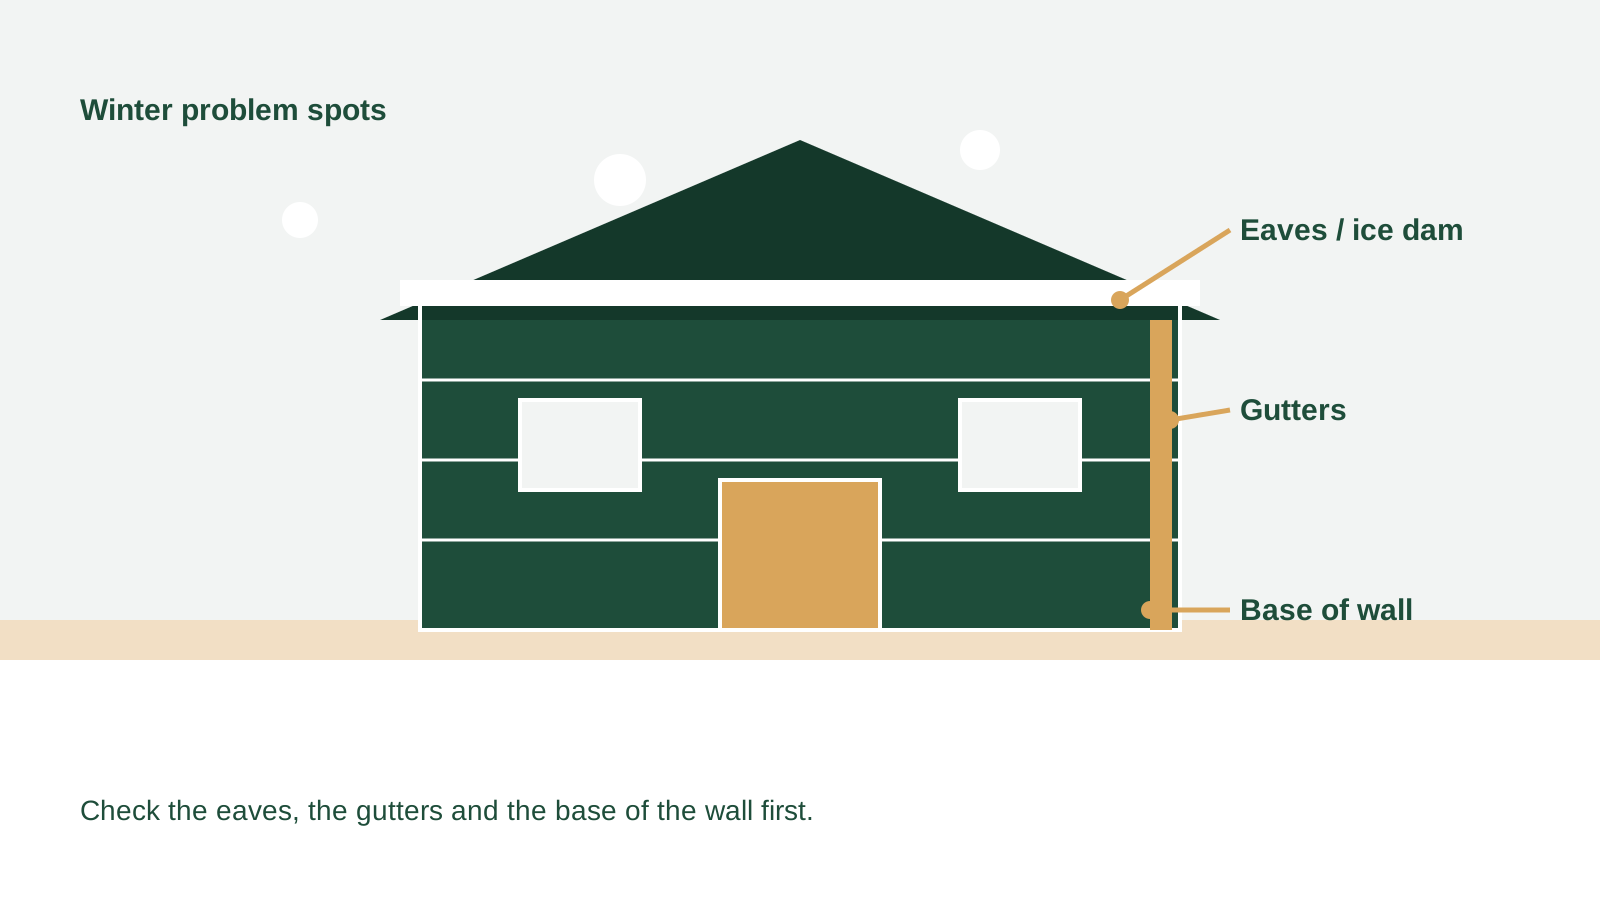
Fall inspection
Start with a careful fall inspection
Begin your fall inspection on a dry, calm day, when light is good and the walls are dry enough for cracks and gaps to show clearly. Walk slowly around the whole house, starting at the front and working clockwise, and look at each wall from several angles rather than straight on. Light raking across a wall reveals lifted laps, bowed boards and loose corners that a head-on glance misses. Look closely at the bottom two courses of siding, the corners, the trim around windows and doors, and anywhere a porch roof, deck or addition meets the main wall. Those junctions move slightly with temperature change and are the first places where a joint opens. In Dorchester triple-deckers and other tall Boston homes, use binoculars for the upper storeys and never lean a ladder against siding that already looks loose.
As you walk, note three things on every wall: anything loose, anything cracked or split, and anything that lets water sit against the cladding. A loose vinyl panel often shows a wavy line or a shadow gap along its lower edge, while a cracked fiber cement board may show a hairline split near a nail or a chipped corner. Wood boards may show a split along the grain, peeling paint or a soft spot where moisture has lingered. Check that trim boards sit tight against the siding with no daylight showing through the joint, and that the small gap at the bottom of the wall is clear of leaves and soil. Take photographs of anything you are unsure about, with the wall and the nearest window or corner in the frame, so you can compare the same spot in spring and describe it clearly if you need advice.
Keep a simple written record of the fall inspection, because a note made in October is far more useful in March than a memory of a wall glanced at once. For each wall, write the date, the weather, and a short line for every defect you found, with its position counted in courses from the ground and measured from the nearest corner or window. Add a photograph for each item, taken straight on and from a step to the side, so a lifted lap or a cracked board shows clearly. That record does three useful things. First, it lets you check in spring whether a defect has grown, moved or stayed the same, which is the clearest guide to how urgent it is. Second, it helps you describe a problem clearly on the telephone, with a location and a size, instead of trying to recall a vague damp patch. Third, it stops small items from being forgotten once snow covers the lower courses and the walls are harder to see. Keep the notebook and the photographs together in one place, and add to them after each storm, so the spring walk starts from a complete picture rather than a fresh search, and so any contractor you speak with can see exactly what changed and when.
Cleaning
Clean the siding before winter sets in
Cleaning before winter matters because dirt, algae, pollen and leaf stains hold moisture against the surface and hide the very defects you need to see. A clean wall dries faster after rain and snow, and a hairline crack that was hidden under grime in October becomes visible once the surface is washed. Work from the top down in sections, using a garden hose and a soft-bristle brush with a mild household soap made for exterior washing, and rinse thoroughly so no soap film is left behind. Avoid high-pressure washing, which can drive water behind laps, strip paint from wood and force water into joints that would otherwise stay dry. If you are unsure about a product or a method, test it on a small, sheltered area first and read the siding maker's care guidance before going further.
Give extra attention to the places that stay damp longest: the north-facing walls, the shaded side beside a fence or hedge, the wall behind a shrub that touches the cladding, and the lower courses near the ground. Trim back shrubs so there is a clear gap between foliage and siding, and clear leaves, mulch and soil away from the base of the wall so the bottom course can dry after rain. Wash the trim and the underside of the eaves as well, since grime there can mask a gap where meltwater enters. Let the walls dry fully on a breezy day before you move on to sealing, because caulk and sealant bond poorly to a damp surface. A clean, dry wall is also far easier to inspect again in spring, when you will want to compare what winter has changed.
After cleaning, let the walls dry fully and walk them once more before you seal anything, because a clean wall often reveals a second round of small defects that grime had hidden. Look again at the laps, the trim joints and the bottom course, and check for paint that has lifted in a thin curl, a nail head that has worked loose, or a board edge that looks swollen after washing. If a section stays damp long after the rest of the wall has dried, note it, because that patch may be holding water behind the cladding or sitting in shade that never dries in winter. Clean the ground at the base of the wall as well, sweeping leaves and soil away from the bottom course and checking that the ground slopes away from the house rather than toward it. A tidy base, a dry surface and a clear record of what you found put the sealing work that follows on a sound footing, and they make the spring comparison far easier, since you will be able to tell at a glance whether a mark is new or was already there in the fall.
Sealing
Seal joints, seams and trim before the cold
Sealing is the quiet work that keeps a Boston winter outside where it belongs. Walk the walls again after cleaning and look for the narrow joints where one material meets another: around window and door trim, at inside and outside corners, where a pipe or cable passes through the wall, and along the top of a horizontal trim board. A bead of exterior caulk that has shrunk, cracked or pulled away from one side leaves a direct path for wind-driven rain and meltwater. Remove loose material with a small scraper, clean the joint, let it dry, and apply a fresh bead of exterior-grade sealant made for the materials on either side, smoothing it with a damp finger so it bonds to both faces. Work on a mild, dry day, and follow the product instructions for temperature and curing time.
Do not seal the weep holes or drainage gaps that are part of the siding system itself. Vinyl siding, for example, is designed with small openings that let any water that gets behind the panels drain out, and blocking them traps moisture rather than keeping it out. The same care applies at the bottom of the wall: leave the designed gap clear and do not pack it with sealant or soil. If a joint is wider than a normal caulk bead can bridge, or if the trim behind it is soft or moves when pressed, that is a sign the problem goes deeper than a surface seal, and a closer inspection is needed. For guidance on what lies behind a damp wall, read our guide to moisture behind siding, and if a wide area is affected, a siding repair visit can assess the wall properly.
Gutters and downspouts
Get gutters and downspouts ready for snow and meltwater
Gutters and downspouts do more winter work than any other part of the house, because they decide whether meltwater runs away from the walls or spills down the siding and pools at the base. In late fall, after most leaves have dropped, clear every gutter by hand or with a scoop, then flush the run with a hose and watch the water travel to the downspout without pooling. Check that each downspout is firmly attached, that its joints are tight, and that the outlet at the bottom directs water well away from the foundation and the lower courses of siding. A downspout that ends right beside the wall will splash meltwater back onto the cladding all winter, so extend it or add a splash block that carries water clear of the house.
Look up at the gutter line from the ground and check for sagging runs, gaps at the corners and places where water stains the siding below the gutter. A stain that runs down the wall under a gutter joint usually means the joint is leaking, and the same water that marks the siding is also wetting the trim and the wall behind it. Tighten loose brackets, refasten a sagging section and replace a cracked end cap before the first hard frost, when a gutter full of standing water can freeze and pull away from the fascia. Keep an eye on the gutters again after each heavy snow, because a gutter packed with ice and snow adds weight to the fascia and can hide a leak until the thaw. Homes in South Boston and other coastal neighbourhoods, where wind drives rain sideways, benefit most from this check, since wind can push gutter overflow straight against the wall.
Your year at a glance
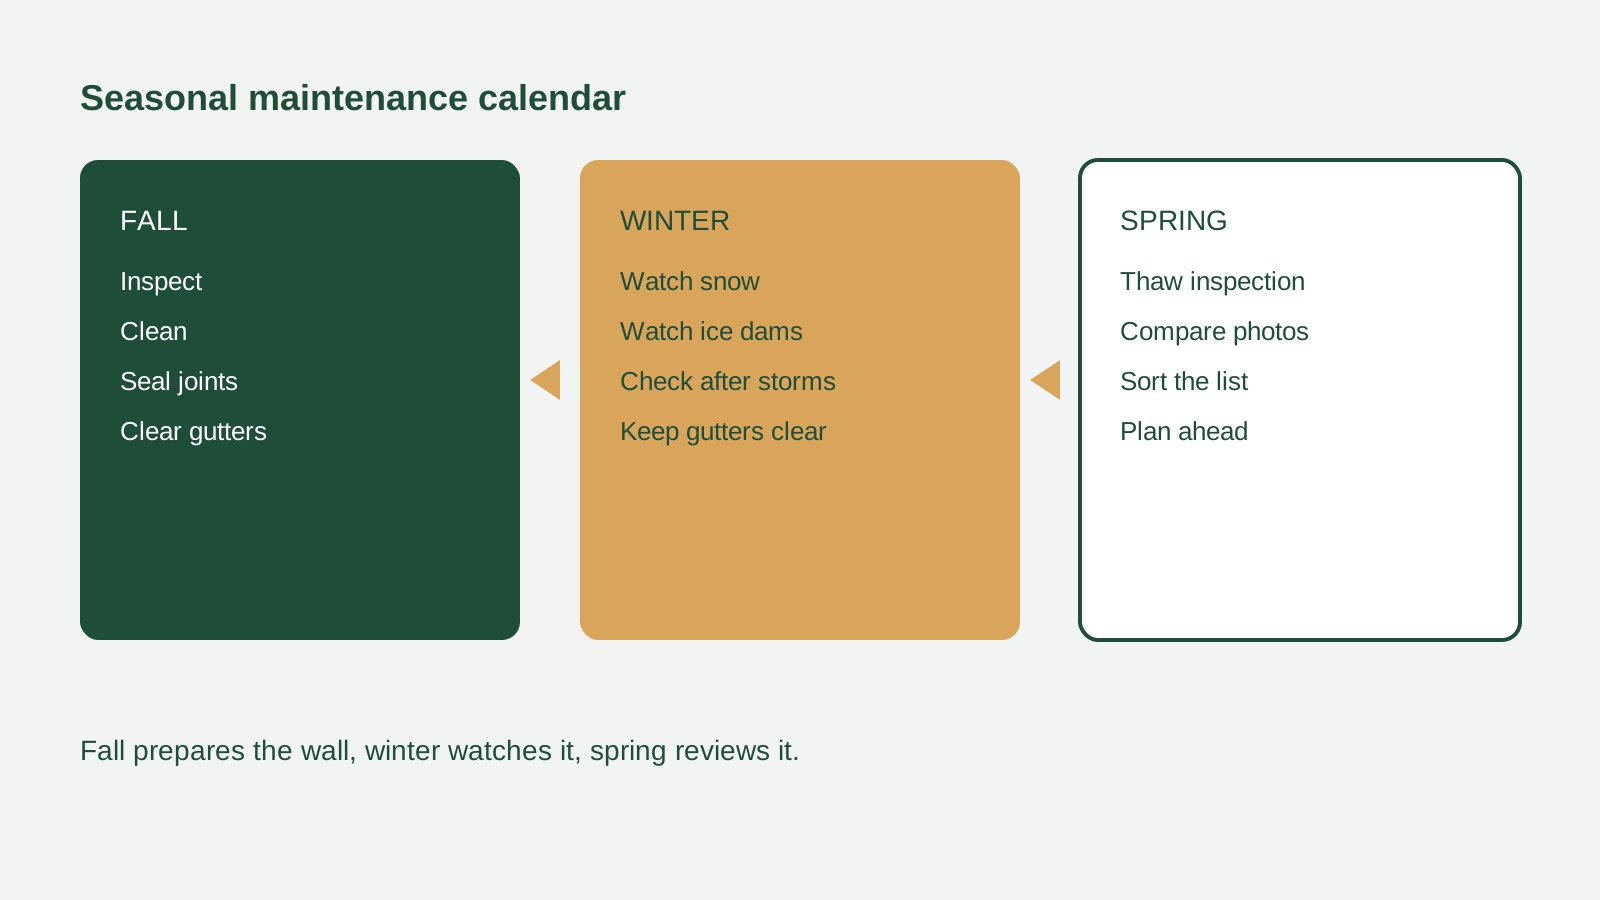
Snow and ice
Manage snow buildup and ice dams from the ground
Through the winter itself, the safest care is done from the ground, and the first habit to build is keeping snow from resting against the siding for long periods. After a snowfall, clear paths and driveways so piled snow does not lean against the lower courses, and keep the ground beside the wall clear of drifted snow where you can reach it safely. Snow that sits against the wall melts slowly, keeps the bottom course damp for days and can hide a loose panel or a gap at the base. Use a long-handled roof rake from the ground to ease heavy snow off the lowest part of the roof edge where you can do so without climbing, and never use a metal shovel, an axe or a sharp tool on the roof or the siding itself, since a single scrape can split a cold vinyl panel or gouge a painted wood board.
Ice dams form when heat from the house melts snow on the roof and the meltwater refreezes at the colder eaves, building a ridge of ice that traps later meltwater behind it. That trapped water can back up under shingles and find its way to the top of the wall, where it shows as damp trim, peeling paint or a stain on the siding just below the eaves. You can reduce the risk by keeping gutters clear, keeping snow from building deep at the eaves, and watching for the warning signs after a thaw: long icicles hanging from one stretch of gutter, a thick ridge of ice at the roof edge, or water marks on the wall beneath the eaves. Never climb onto an icy roof and never chip at an ice dam with a hammer or an axe, which can damage shingles, gutters and siding in seconds. If a dam is large, or water is coming inside, call for help promptly and describe what you can see from the ground.
Through the coldest weeks, also watch the inside of the house for signs that meltwater has found a way in, since an interior mark often appears before the outside wall shows a clear stain. Look at ceilings and walls just below the eaves, around window frames and in the top corners of upstairs rooms, for a damp patch, a faint brown ring, peeling paint or a musty smell that was not there in fall. Check the attic hatch and the upstairs windows after a thaw, and note whether condensation gathers on the glass in one room more than the others. None of those signs proves the siding is at fault on its own, and other parts of the house can cause damp as well, but a new interior mark that lines up with an ice dam or a stained stretch of siding outside is a strong reason to look closely at that wall. Record the date, take a photograph and keep the area dry while you seek advice, rather than waiting for the next thaw to make the mark larger or letting a small damp patch spread across a ceiling.
After storms and thaws
Check the walls after storms and thaws
After a coastal storm, a nor'easter or a heavy thaw, give the walls a fresh look within a day or two, once it is safe to walk around the house. Wind can lift a panel just enough to break its lock without tearing it away, and that loosened panel may flap in the next gust and let rain in behind it. Walk the windward side first, usually the side that faced the strongest gusts, and look for panels that sit out of line, corners that have opened, and trim that has shifted. Check the walls beneath the eaves and around windows for fresh water marks, and look at the ground for pieces of siding, trim or fasteners that the wind may have dropped. Photograph anything that has moved, even if it looks minor, so you have a record of when the change appeared.
Thaws deserve the same attention as storms, because a thaw is when trapped water finally moves. As snow melts, watch the base of each wall for water pooling against the siding, and check that downspouts are running clear rather than blocked by ice at the outlet. Inside the house, a new damp patch, a musty smell near an outside wall, or paint bubbling on an interior wall below a window can all point to water that entered through the siding during the storm or the thaw. If you find a panel that has come loose, do not force it back with nails through the face of the siding, which can crack cold vinyl and leave a permanent hole. Note the location, keep the area as dry as you can, and seek advice. Our guide to siding after hail or wind damage explains how to record storm effects, and storm damage siding repair covers the next steps when a wide area is affected.
Minor repairs
Spot the minor repairs that matter most
The minor repairs to spot are the ones a homeowner can see and describe clearly, even if the fix itself needs a tradesperson. A loose vinyl panel that has slipped from its lock, a cracked board, a missing piece of trim, a nail head that has popped and left a small hole, and a gap where trim meets siding all belong on that list. So do boards that bow outward in cold weather, panels that rattle in the wind, and any place where you can see the wall behind the siding through a gap. Mark each spot with a small piece of painter's tape on the siding beside it, or note its position by counting courses from the ground and measuring from the nearest corner, so you or a contractor can find it again without searching the whole wall.
Some signs call for a quicker response than others. A gap that shows the wall behind the cladding, a board that is cracked right through, a panel that is hanging by one fastener, and any place where water is visibly running behind the siding should all be treated as urgent, because each storm or thaw can widen them. A single hairline crack in a board that is otherwise firm, or a small gap at a trim joint that can be sealed, is less urgent but still to note and seal before the next cold snap. If you are weighing whether a wall needs a small fix or something larger, our guide to signs your siding needs replacing walks through that decision, and the siding repair page explains how a local contractor approaches a repair visit. Never work from a ladder on icy ground, and never reach for a repair that needs you to stand on a roof.
Material care
Winter care by material: vinyl, fiber cement and wood
Vinyl siding needs gentle winter care. Cold vinyl becomes stiffer and more brittle, so avoid striking it, leaning heavy objects against it or forcing a stiff panel back into place on a freezing day. When you wash vinyl, use a soft brush and a mild soap, rinse well, and let it dry before the temperature drops at night. Check the laps after a cold snap, because a panel that contracted in the cold can sit slightly out of line until the next mild day, and a panel that stays out of line after warming up may have slipped its lock. Keep grills, heaters and other heat sources well away from vinyl walls, and keep snow and ice from pressing against the lower courses for long stretches. If a vinyl panel cracks, note its position and size rather than patching it with a surface filler that will not hold through the next freeze.
Fiber cement siding is a sturdy material that handles cold well, but its winter care still centres on keeping water out of joints and edges. Check the caulked joints between boards and at trim, since those are the places where a small opening can let meltwater reach the board edge. Look for chipped corners and hairline cracks near fasteners, and for paint that has lifted or peeled, which can expose the surface to repeated wetting. Wash fiber cement with a soft brush and a gentle cleaner, rinse thoroughly, and avoid directing a hose jet straight into a joint or under a lap. Keep soil, mulch and snow clear of the bottom course so the board edge can dry, and treat any soft or swollen area at a board edge as a sign to seek advice rather than sealing over it.
Wood siding asks for the most watchful winter care, because wood moves with moisture and temperature and its paint or stain is its first line of defence. Before winter, look for peeling or blistered paint, bare patches where the finish has worn thin, and boards that have cupped or split along the grain. A small bare patch can be noted for attention in spring, when the weather suits repainting, rather than painted over in cold, damp conditions that will not let the coating cure. Through winter, keep wood walls as dry as you can by keeping gutters clear, shrubs trimmed back and snow away from the base, and check the lower courses after thaws for boards that stay damp long after the rest of the wall has dried. For a wider look at how wood compares with other claddings in a cold climate, see our cold-winter siding choices guide, and for a direct comparison read vinyl versus fiber cement.
How meltwater reaches the wall
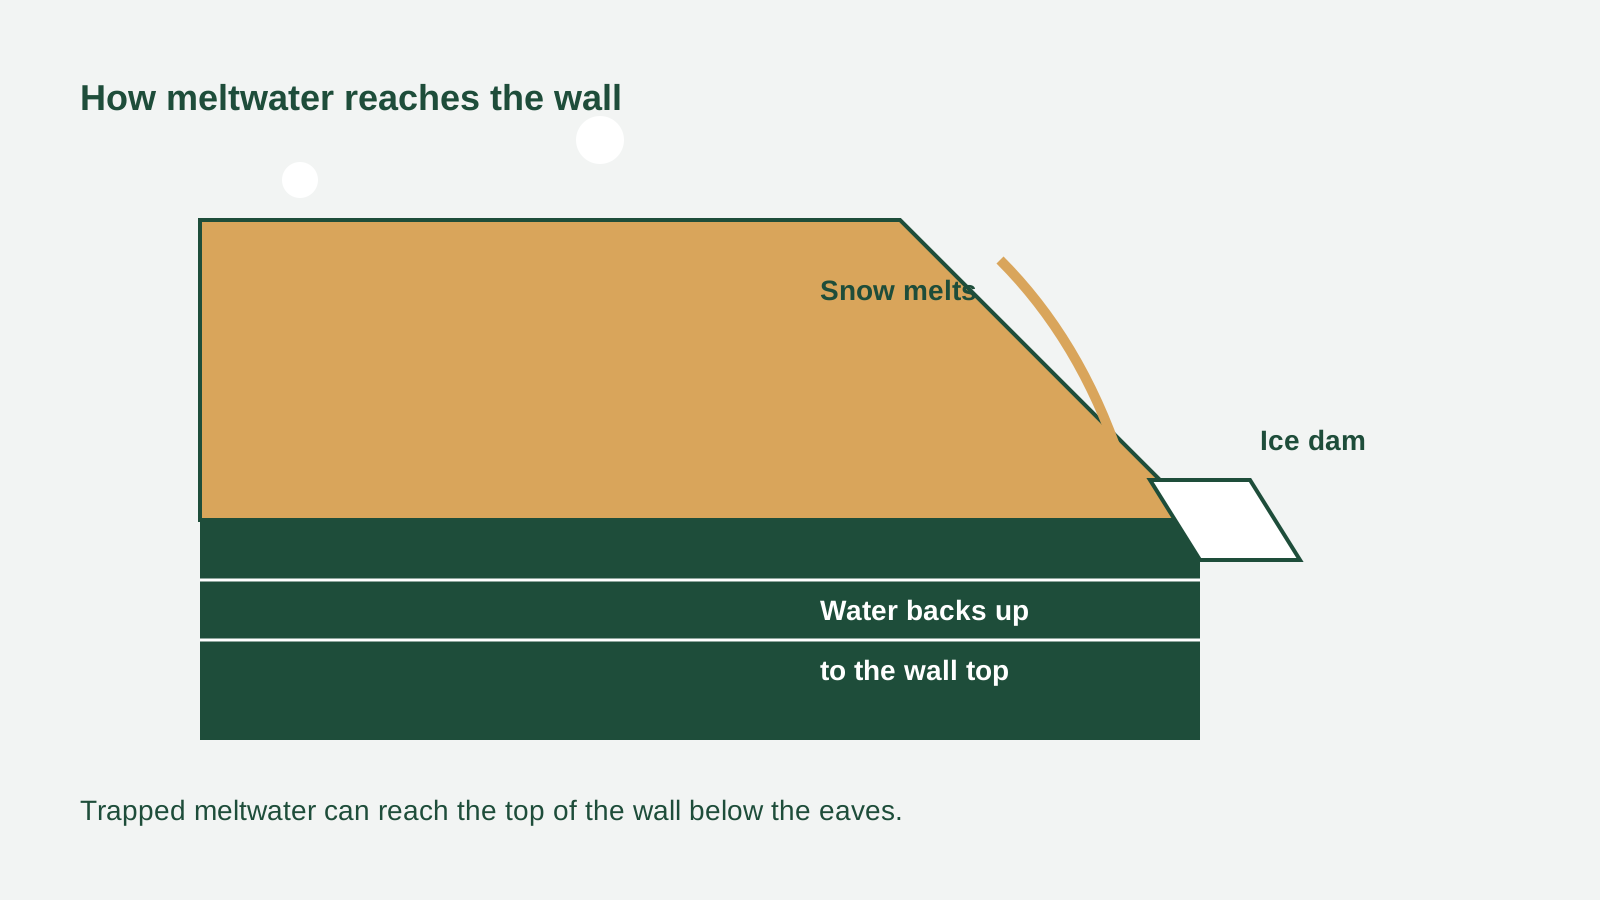
Spring thaw inspection
Finish with a spring thaw inspection
When the last snow has gone and the walls have had a few dry, mild days, walk the whole house again with your fall photographs in hand and compare each wall, course by course. Look for the changes winter leaves behind: panels that have slipped, caulk that has cracked, paint that has lifted, boards that have bowed, and trim that has opened at a joint. Look closely at the top of the wall just below the eaves, where ice dam water may have left a stain, and to the bottom course, where snow and meltwater sat longest. Check the ground for pieces of siding or trim, and check the gutters for sections that sagged under ice and snow. A wall that looked sound in fall and shows a new gap or a fresh stain in spring has told you exactly where winter found a weakness.
Use the spring walk to sort what you found into three groups: things you can tidy now, things to watch through the next season, and things that need a contractor's eye. Cleaning, trimming shrubs, clearing the base of the wall and resealing a small trim joint belong in the first group. A hairline crack that has not grown, a panel that sits slightly out of line but is firm, and a small paint blemish belong in the second group, with a photograph and a note to check them again in fall. Anything that shows the wall behind the cladding, a board that is soft when pressed, a wide area of lifted paint, or a stain that keeps returning after rain belongs in the third group. Homes in Charlestown, Jamaica Plain and West Roxbury share the same spring routine, and the earlier you sort the list, the easier it is to plan the season ahead. If you are unsure whether a wall needs a permit for the work that follows, read our Boston siding permits guide, and if you want help choosing who to call, see hiring a siding contractor in Boston.
A safe ground-level check
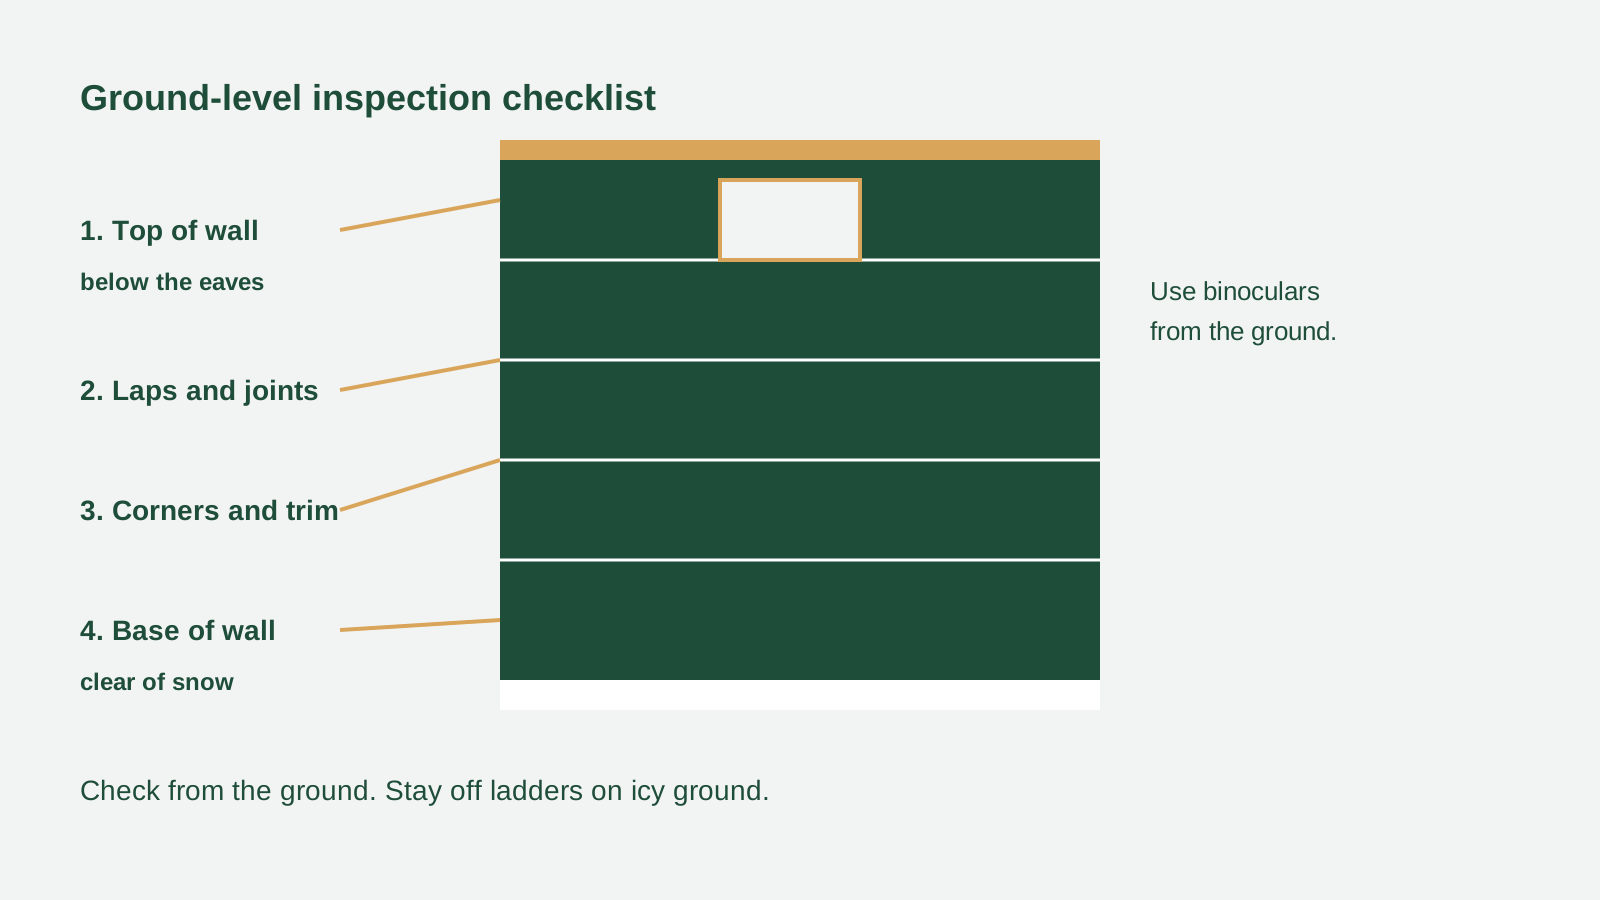
Avoid these
Mistakes to avoid with winter siding care
- Skipping the fall inspection because the walls looked sound last spring, when a year of weather can open new gaps.
- Washing with high pressure, which can drive water behind laps and into joints that would otherwise stay dry.
- Sealing weep holes and drainage gaps that are part of the siding system and need to stay open.
- Letting gutters stay blocked into the first frost, so standing water freezes and pulls the gutter away from the fascia.
- Piling snow against the lower courses of siding, where it keeps the wall damp for days after each snowfall.
- Climbing onto an icy roof or chipping at an ice dam with a hard tool, which can damage shingles, gutters and siding.
- Forcing a cold, stiff panel back into place on a freezing day, which can crack vinyl or split a wood board.
- Painting or sealing a damp wall in cold weather, when the coating cannot cure and will not bond properly.
Questions
Winter siding care: your questions answered
How often should I inspect siding before winter in Boston?
Inspect every wall once in fall, before the first hard frost, and again in spring after the thaw. A quick ground-level look after each major storm or thaw in between is enough for most homes, and it helps you catch a loose panel or a fresh water mark while it is still small.
What is the best time in fall to do a siding inspection?
Choose a dry, calm day with good light, after most leaves have fallen and before the first hard frost. Dry walls show cracks and gaps clearly, and you still have mild days left for cleaning, sealing and gutter work before the cold sets in.
Can I wash siding in cold weather?
Wash siding on a mild day well before winter, using a garden hose, a soft brush and a mild soap made for exterior washing. Avoid washing on a freezing day, when rinse water can freeze on the wall, and avoid high-pressure washing, which can drive water behind the panels.
How do I keep snow from piling against siding?
Clear paths and driveways so piled snow does not lean against the lower courses, and keep drifted snow away from the base of the wall where you can reach it safely from the ground. Check the wall base after each heavy snowfall and after ploughing, when drifts often build up beside the house.
What should I do if I see an ice dam?
Watch it from the ground and look for water marks on the wall below the eaves or damp trim. Keep gutters clear and ease snow off the lowest roof edge with a long-handled roof rake if you can do so safely. Never climb onto an icy roof or chip at the ice, and call for help if the dam is large or water is coming inside.
Are icicles a sign of a siding problem?
A few small icicles are common in a Boston winter, but long icicles along one stretch of gutter, a thick ridge of ice at the eaves, or icicles paired with a water mark on the wall below can point to meltwater backing up. Note where they form and check that wall closely after the thaw.
How do I tell if a panel is loose?
Look for a wavy line or a shadow gap along the lower edge of a panel, a corner that has opened, or a panel that rattles in the wind. Light raking across the wall from the side makes a lifted lap easier to see. Mark the spot with painter's tape and note its position from the nearest corner.
What gaps should I seal before winter?
Seal the narrow joints where trim meets siding, around windows and doors, at corners, and where a pipe or cable passes through the wall. Leave weep holes and drainage gaps open, since they are part of the siding system and let water that gets behind the panels drain out.
Should I clear gutters in late fall?
Yes, clear gutters after most leaves have dropped and before the first hard frost, then flush each run with a hose and check that water reaches the downspout without pooling. Check that downspouts direct water well away from the wall and the foundation, and clear them again if a storm fills them with debris.
How do I care for wood siding in winter?
Keep wood walls dry by clearing gutters, trimming shrubs back and keeping snow away from the base. Look for peeling paint, bare patches and boards that have cupped or split, and note them for spring, when mild weather suits repainting. Treat a board that is soft to the touch or stays damp long after rain as a sign to seek advice.
When should I call a contractor about winter siding damage?
Call promptly if a gap shows the wall behind the cladding, a board is cracked right through, a panel is hanging by one fastener, or water is running behind the siding. A wide area of lifted paint, a soft board, or a stain that keeps returning after rain also deserves a closer look from a contractor.
What should I check first after a spring thaw?
Walk every wall with your fall photographs and compare each one, course by course. Check the top of the wall below the eaves for ice dam stains, the bottom course where snow sat longest, and the caulk and paint for cracks or lifting. Sort what you find into tidy now, watch, and seek advice.